
A complete history of restoration, backlights, bivert boards, IPS displays, USB-C power, and modern retro handheld culture
The original Game Boy is not the most powerful handheld Nintendo ever made, and it was never the easiest to see. That is part of its charm. More than three decades after its debut, the gray DMG-01 still feels sturdy, understandable, and inviting. You can open it, see how the major pieces fit together, replace what has worn out, and decide how much of 1989 you want to keep.
That flexibility made original Game Boy modding a hobby in its own right. Some owners want a careful Game Boy DMG-01 restoration that looks exactly as they remember it. Others want a brighter screen, rechargeable power, better audio, and a shell that Nintendo never produced. The history of the scene is the story of those two impulses learning to coexist: preservation on one side, practical playability on the other.

This article contains affiliate links. As an Amazon Associate, Console Canyon earns from qualifying purchases, at no extra cost to you. Learn more.
Table of Contents
The DMG-01 Hardware and Early Tinkering
A portable built for real use
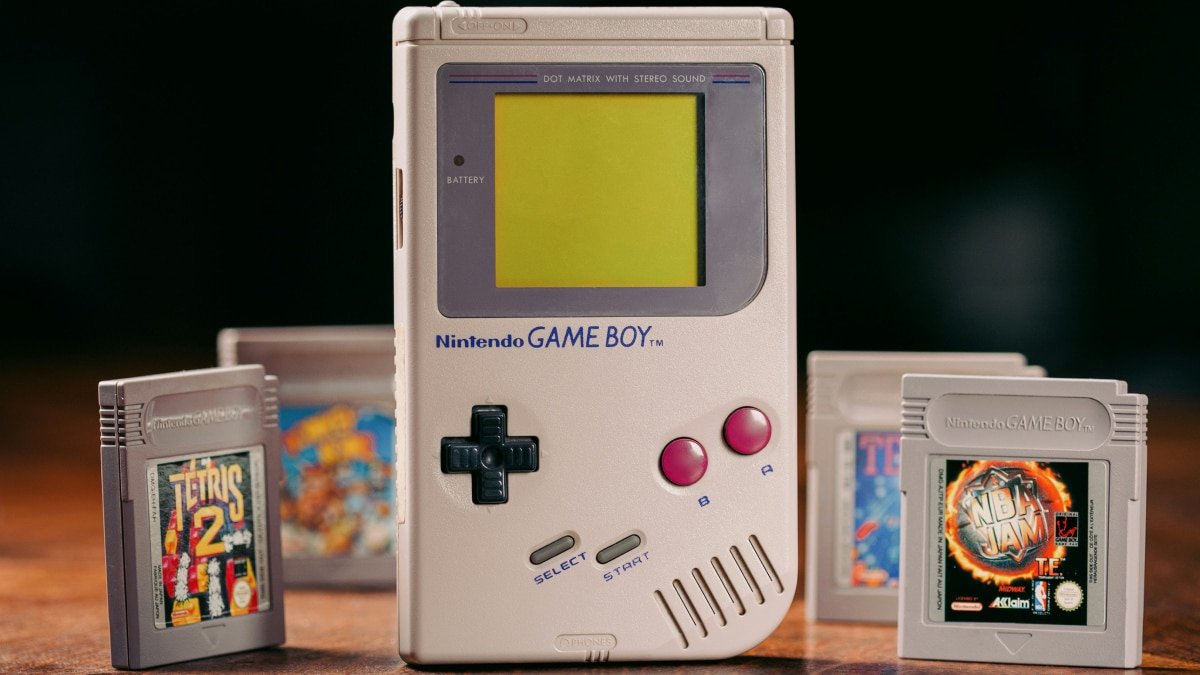
Nintendo released the Game Boy in Japan on April 21, 1989, followed by North America later that year. The DMG-01 paired modest hardware with excellent battery life, interchangeable cartridges, a familiar control layout, and a library that quickly moved beyond the pack-in appeal of Tetris.
Its most recognizable feature was the reflective, four-shade LCD. The screen had no internal light, so players needed daylight, a lamp, or one of the many clip-on accessories sold during the system’s commercial life. Motion could smear because of the display’s slow response. Even so, the tradeoff made sense in 1989. Nintendo prioritized price, portability, and battery life rather than chasing a color display that would drain batteries much faster.
Four AA batteries powered the system. A plastic shell protected the electronics, a single speaker handled external audio, and the headphone jack provided stereo output. The link port allowed compatible games to communicate, turning a solitary handheld into a social machine. That port mattered for early multiplayer titles and became even more important after Pokémon made trading part of the game itself.
Why the DMG invited repair
The Game Boy was built to survive backpacks, bedrooms, family road trips, and schoolyards. Many units did. That durability gave future modders an enormous supply of consoles that were scratched, yellowed, or electrically temperamental but still repairable.
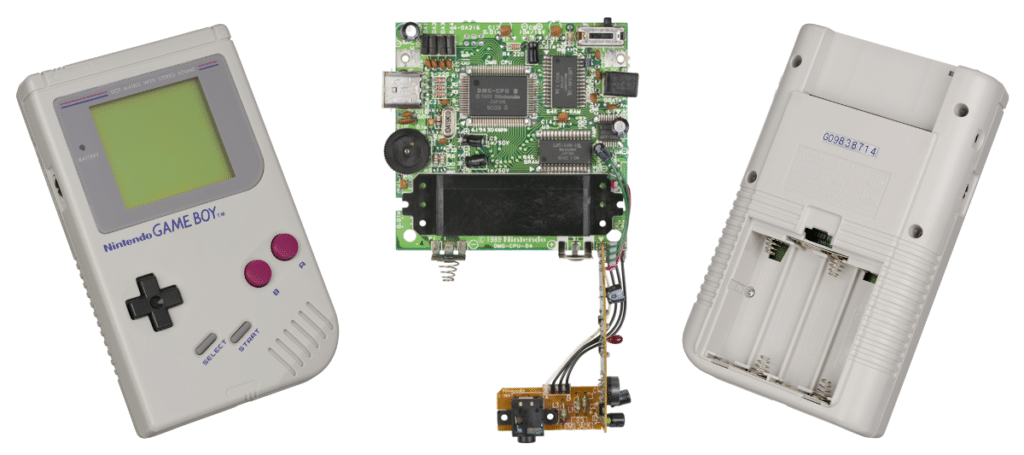
Inside, the DMG is divided into understandable sections. The front half carries the controls, speaker, and display assembly. The rear contains the main logic board, cartridge connector, link port, and power circuitry. A ribbon cable joins the two halves. Screws, plastic posts, membranes, and connectors do most of the mechanical work. Compared with modern glued and tightly integrated electronics, the DMG feels refreshingly approachable.
That does not mean every job is easy. The original LCD glass and its ribbon connections are fragile, battery leakage can destroy copper traces, and previous repair attempts sometimes cause more trouble than age itself. Still, the overall structure made the DMG a natural platform for cleaning, parts swapping, and experimentation.
Before commercial kits
The earliest modifications were usually practical or cosmetic rather than products from a dedicated modding industry. Owners cleaned corroded contacts, replaced damaged speakers, moved usable parts between donor systems, painted shells, changed power LEDs, and installed new plastic screen covers. A cracked lens or worn button membrane did not require a new console if another unit could supply the part.
These projects were often poorly documented. Instructions passed through personal websites, message boards, local repair shops, and conversations between hobbyists. Results varied, but the basic idea was already established: the Game Boy was not sealed history. It was hardware that an owner could maintain and personalize.
Backlights, Contrast, and the Bivert Era
Solving the screen problem
For many players, the DMG’s screen was the one part of the experience that nostalgia could not fix. It needed strong ambient light, ghosted during movement, and became harder to use as polarizer films and adhesives aged. Vertical lines, damaged films, uneven contrast, and screen burn added restoration problems on top of the original design limits.
Frontlights offered one answer. A light guide placed in front of the LCD illuminated the image without replacing the display. The approach could help in a dark room, but uneven lighting, glare, and dust were common concerns. Backlights became the more influential solution for the original DMG.
How the classic backlight mod worked
A traditional Game Boy backlight mod keeps the original LCD but places a thin LED panel behind it. To make room for the light, the installer removes the reflective layer from the rear of the LCD and adds a replacement polarizer. The result retains the slow, soft character of the original display while making it visible in dim conditions.
This was never a risk-free beginner modification. The LCD is made of thin glass, the rear films can be stubborn, and the ribbon cables are easy to damage. Adhesive residue must be removed without scratching the panel. Dust, fingerprints, or a slightly rotated polarizer can remain visible after reassembly. Many otherwise functional original screens were lost during ambitious first attempts.
Commercial LED panels eventually made the electrical side more repeatable. Instead of building a light source from loose LEDs and improvised diffusion materials, modders could buy a thin panel sized for the DMG. Retailers also published installation guides, recommended resistor values, and warnings based on years of failed installations.
Why the contrast wheel matters
The wheel on the left side of the DMG adjusts the voltage that drives the LCD. On a stock screen, it helps the player find a usable balance as viewing angle and temperature change. After a backlight or polarizer modification, that adjustment becomes even more important because the new optical stack changes how the pixels appear.
A poorly tuned screen may look washed out, overly dark, or inconsistent across its four shades. The contrast control cannot eliminate the panel’s inherent ghosting, but it remains essential for getting the best image from the original display.
The Game Boy bivert mod
The Game Boy bivert mod was developed to improve contrast on a backlit original LCD. The name refers to two inversions. First, the LCD image is inverted electronically with a logic chip. Second, the optical effect is inverted by changing the polarizer orientation. Because the image is inverted twice, games appear normal, but dark and light states are separated more strongly.
A good backlight and bivert combination can look striking. Pixels become darker, the lit background appears cleaner, and the screen keeps a distinctly original texture that an IPS panel does not reproduce exactly. This made the combination a favorite among modders who wanted better visibility without replacing the factory LCD.
The limits are just as important. Biverting does not fix response time, so motion blur remains. It requires soldering around small LCD connector pins or traces, depending on the board and module. A mistake can damage the front board. It is also unnecessary for most modern replacement displays, which use their own driver electronics.
Online Communities and Repeatable Kits
Knowledge becomes searchable
The expansion of online retro gaming communities changed the scale of Game Boy modding. Forum threads preserved troubleshooting discussions. Personal blogs turned successful experiments into tutorials. YouTube made difficult procedures easier to understand because viewers could see how much force an installer used, where a wire was routed, and what a finished screen looked like.
Marketplaces also connected owners with replacement parts that had once required a donor console. New shells, button sets, membranes, glass lenses, speakers, capacitors, and power components became easier to find. A person no longer needed a box of broken Game Boys to complete one good restoration.
From experiments to products
Specialist retailers helped turn one-off projects into repeatable kits. Companies such as Hand Held Legend, FunnyPlaying, RetroSix, Retro Modding, ZedLabz, and other regional sellers offered combinations of parts, documentation, and customer support. Their catalogs changed over time, but the broader effect was clear. Modding became accessible to people who had never designed a circuit or sourced raw display components.
Standardization did not eliminate variation. The DMG went through board revisions, manufacturers updated their kits, and similar-looking products sometimes required different solder points or shell cuts. Community guides remained valuable, but the current instructions from the seller became the most important reference for a specific kit.
This period also changed how finished systems looked. Replacement shells were no longer limited to factory gray or a coat of spray paint. Transparent shells, unusual colors, custom labels, glass lenses, and coordinated button sets made the DMG a design object as much as a repaired console.
IPS Screens Modernize the DMG
A replacement rather than a modification
An IPS screen conversion takes a different approach from a traditional backlight. Instead of modifying the original LCD, it replaces the display with a modern panel and driver board. The original motherboard still runs the game, but new electronics interpret its video signal and present it on a bright, fast, backlit screen.
This changed what a modified DMG could be. Players gained wide viewing angles, strong brightness, sharper pixel edges, and far less dependence on surviving factory LCDs. Many kits added adjustable brightness, selectable color palettes, pixel-grid effects, or on-screen menus. The console still played the same cartridges, but it became much easier to use on a couch, at a desk, or on stage.
The tradeoffs behind the better picture
IPS installation is often easier than peeling films from original LCD glass, but it introduces a different set of decisions. Some kits need the inner shell trimmed. Others are designed for an IPS-ready replacement shell with molded mounting points. Larger display areas may require a matching lens with a wider window. Alignment brackets help, but a slightly crooked panel is obvious once the console is assembled.
Controls also vary. One kit may reuse the contrast wheel for brightness and palette selection, while another uses touch sensors hidden behind the shell. Some require soldering only for a speaker or optional controls. Others use additional wires or replacement button boards. Power consumption is generally higher than on an unmodified DMG, and certain combinations of display, flash cartridge, amplifier, and aging power hardware can expose voltage instability or audio noise.
The practical lesson is simple: there is no universal Game Boy IPS screen mod. Product names, PCB colors, revision numbers, and seller photos can look similar even when the instructions differ. Buyers should identify the exact revision, read the current guide, and bench-test the display before removing protective films or modifying a shell.
Preservation or playability?
IPS displays also sharpened an old debate. Preservation-minded collectors argue that an intact original screen, shell, and label are part of the artifact. Cutting an early shell or discarding a working LCD trades history for convenience. Players answer that hardware earns its keep by being used, and a readable display gives an old motherboard decades of practical life.
Both positions are reasonable. Condition matters. A clean, complete early unit is a better candidate for conservative restoration than a system with a ruined screen and cracked shell. Modders can also reduce the conflict by using a new IPS-ready shell and storing the original front assembly. That does not make every change reversible, but it avoids cutting scarce original plastic.
Power, Audio, and Everyday Usability
Rechargeable power and USB-C
The stock DMG runs on four AA batteries, a design that remains practical because rechargeable NiMH cells are inexpensive, replaceable, and widely available. For some owners, that is still the safest and most repairable solution. Others want the convenience of plugging the console into the same USB-C cable used for modern devices.
A Game Boy USB-C battery mod usually combines a lithium-ion or lithium-polymer cell with a charging and protection board. Some products are drop-in packs that occupy the original battery bay. Others require a replacement battery door, new wiring, or changes to the shell. Better systems include protection against overcharge, over-discharge, short circuits, and excessive temperature.
Lithium battery safety: Lithium battery work deserves caution. Cell quality, charging design, heat management, and physical protection matter more than advertised capacity. Newcomers should choose a protected system from a reputable supplier and follow its documentation. A homemade charging circuit is not a good first electronics project, especially inside a plastic handheld that may be stored in a bag or drawer.
Clean power and indicators
Replacement power regulators and power boards became more common as builders stacked several upgrades into one machine. A stock regulator that seems fine with the original screen may behave differently when an IPS panel, amplifier, and flash cartridge draw power at the same time. Modern boards can provide more stable rails, reduce interference, and support battery indicators, but they must still match the console and the rest of the build.
Game Boy audio mods
The DMG’s sound has always been part of its identity. Games use two pulse channels, a programmable wave channel, and a noise channel. Through the internal speaker, that hardware sounds small and immediate. Through headphones or recording equipment, it can become surprisingly expressive.
A typical Game Boy audio mod might replace a tired speaker, add an amplifier, improve grounding, service the headphone jack, or provide a cleaner line-level output. Louder is not always better. Amplifiers can reveal the system’s noise floor, and display or power modifications may introduce whine that was less noticeable in a stock console. Good audio work treats power, grounding, routing, and output level as one system.
That matters to chiptune musicians. Software such as Little Sound Dj, commonly called LSDj, turns the Game Boy into a portable sequencer and synthesizer. For a performer, a stable power system, readable screen, responsive controls, and reliable audio jack can be more valuable than cosmetic perfection.
Shells, Buttons, and Personal Style
A Game Boy shell replacement can be a restoration part, a practical upgrade, or a creative choice. A cracked factory shell may no longer hold screws securely. An IPS-ready shell can avoid cutting original plastic. A transparent or brightly colored shell can turn the console into something personal.
Quality varies. Poorly molded shells may have rough seams, weak screw posts, inaccurate openings, or battery compartments that fit too tightly. Buttons and silicone membranes also affect feel. A build can look excellent and still be unpleasant to use if the D-pad pivots badly or the contacts require too much pressure.
Glass lenses resist scratches better than the original plastic window and are available in stock and enlarged IPS sizes. Replacement labels can complete a restoration, but they should not be used to misrepresent a modified console as factory original when it is sold. Clear documentation protects future buyers and helps preserve the history of the hardware.
The Current Game Boy Modding Scene
Two hobbies sharing one console
The modern scene includes careful restorers, electronics hobbyists, artists, speedrunners, chiptune performers, collectors, and people who simply want to play an old copy of Tetris. They do not all want the same Game Boy, which is why the platform supports so many approaches.
A preservation-focused build may keep the original LCD, shell, label, speaker, and power system while replacing only failed components. A daily-driver build may use an IPS display, USB-C battery, modern regulator, fresh speaker, new membranes, and a custom shell. Between those endpoints are countless combinations.
Repairability as part of the appeal
Modding overlaps with right-to-repair culture because it assumes owners should be able to understand, maintain, and alter their hardware. The healthy aftermarket for lenses, shells, buttons, displays, and electrical parts keeps damaged consoles out of drawers and landfills. At the same time, poor reproduction parts and careless installation can consume original hardware faster than it is preserved.
The best modern builds are not necessarily the ones with the longest parts list. They start with an honest assessment of the donor console and a clear purpose. If an original part works well and serves the goal, there may be no reason to replace it.
Cartridges, flash carts, and experimentation
Original cartridges remain central to the experience, but flash cartridges and homebrew development have expanded what the DMG can do. Developers test new games on real hardware. Musicians use tracker software. Hardware designers create cartridge boards, test tools, and experimental peripherals. The machine’s age has not pushed it out of active use. In some ways, its limitations make it more interesting.
Compatibility remains the recurring warning. Kit revisions change, listings are copied between sellers, and an installation guide written for one board may be wrong for another. Before buying, confirm the exact console model, board revision when relevant, shell requirements, lens size, soldering points, expected power draw, and whether the seller’s current documentation matches the product being shipped.
Timeline of Original Game Boy Modding
| Era | Major development | Why it mattered |
|---|---|---|
| 1989 through the 1990s | DMG-01 launches with a reflective LCD, AA power, link port, and rugged modular construction. | A huge installed base and durable hardware create the foundation for future repair and customization. |
| 1990s through early 2000s | Unofficial repair, donor-part swaps, painted shells, replacement lenses, and small cosmetic changes. | Owners begin treating the Game Boy as maintainable hardware before a dedicated commercial mod market exists. |
| Mid-2000s through early 2010s | Frontlight and backlight experiments spread through forums and personal tutorials. | Low-light play becomes possible while retaining the original LCD, though installation risk remains high. |
| Early to mid-2010s | Bivert modules, standardized backlight panels, retailer guides, and video tutorials become widely available. | Screen modification becomes more repeatable, and newcomers gain access to proven parts and shared troubleshooting. |
| Late 2010s through early 2020s | IPS kits, IPS-ready shells, custom lenses, upgraded regulators, and USB-C battery systems expand. | The DMG becomes a practical modern handheld while preservation and reversibility receive more attention. |
| Today | Restoration, customization, chiptune, homebrew, and hardware experimentation coexist. | Original boards remain useful while the aftermarket supports many levels of authenticity and modernization. |
Screen Options Compared
| Approach | Strengths | Limitations | Best fit |
|---|---|---|---|
| Original-screen restoration | Highest visual authenticity, lowest power demand, and no need to replace a working factory LCD. | Still depends on ambient light and retains ghosting, aging films, and a narrow viewing sweet spot. | Collectors, preservation projects, and players who value the original experience. |
| Backlight and bivert | Keeps the original LCD character while adding low-light visibility and stronger contrast. | Fragile film removal, careful soldering, original ghosting, and meaningful risk to the display. | Experienced modders who want a period-style illuminated screen. |
| Modern IPS conversion | Bright image, wide viewing angles, modern controls, optional palettes, and reduced dependence on old LCDs. | Higher power use, possible noise, kit-specific compatibility, and potential shell cutting. | Frequent players who prioritize comfort and readability. |
What to Consider Before Modding
A good build starts with a goal, not a shopping cart. Photograph the console, test every function, and decide what problem you are actually trying to solve before ordering parts.
- Original hardware condition: Check for battery corrosion, damaged traces, missing screws, broken posts, LCD defects, and previous repair work.
- Desired authenticity versus modern usability: Decide whether the console is primarily a collectible, a restoration, a daily player, or a creative custom build.
- Budget: Include tools, shipping, a compatible shell and lens, replacement membranes, and the possibility that a fragile part may need to be replaced.
- Soldering and shell-cutting tolerance: Choose a kit that matches your skill and your willingness to make permanent changes.
- Battery and electrical safety: Use protected rechargeable systems from reputable suppliers, and follow the current manufacturer instructions.
- Reversibility and collector value: Keep original parts, avoid cutting good factory shells when a replacement will work, and document permanent changes.
- Availability and compatibility of parts: Confirm the exact kit revision, board requirements, lens size, control method, and power needs before purchasing.
Shop on Amazon: tri-wing screwdrivers · soldering irons · rechargeable NiMH AA batteries
Frequently Asked Questions
Is an IPS screen always the best upgrade?
No. It is usually the easiest screen to read, but it changes the original appearance, increases power demand, and may require a replacement or modified shell. A clean stock screen can be the better choice for a preservation build.
Does every Game Boy backlight mod need a bivert board?
No. A backlight can work by itself. A bivert board changes how the original LCD signal and polarizer interact, which can improve contrast, but it also adds soldering and installation risk.
Can I install an IPS kit without soldering?
Some kits minimize soldering, but requirements vary. Optional brightness controls, touch sensors, speakers, and power features may still need soldered connections. Read the guide for the exact revision you plan to buy.
Will a Game Boy USB-C battery mod fit every DMG-01?
Not necessarily. Battery doors, shell clearances, board layouts, and charge-and-play behavior vary. Confirm the product is designed for the original DMG and follow its safety instructions.
Should I replace the original shell?
Replace it if it is badly damaged or if a new IPS-ready shell prevents permanent cutting. If the original shell is clean and historically valuable, consider storing it and using a reproduction shell for the modified build.
Why does a modified Game Boy have more audio noise?
IPS displays, amplifiers, flash cartridges, and replacement regulators can change the electrical load or introduce interference. Clean grounding and a well-matched power system matter as much as the speaker itself.
What is the safest first DMG project?
Start with inspection, cleaning, a new lens, and fresh button membranes if needed. These jobs teach careful disassembly without putting the original LCD glass or fine-pitch solder joints at immediate risk.
Conclusion
Original Game Boy modding grew from ordinary repair work into a mature branch of retro gaming culture. Early owners swapped donor parts and improvised lights. Later modders refined the backlight and bivert approach. Today’s builders can choose from IPS screens, USB-C power systems, audio boards, reproduction shells, and carefully documented restoration parts.
The most interesting thing about the DMG-01 is that no single version has replaced the others. A stock screen still has value. A well-executed backlight build preserves a particular period in Game Boy modding history. An IPS system can be the console someone actually plays every week. Each choice reflects a different answer to the same question: how should old hardware continue to live?
For newcomers, the best original Game Boy modding project is usually the one that respects the condition of the starting hardware and solves a real problem. Repair first, modify with purpose, keep the original parts when possible, and treat current seller documentation as part of the kit.
Further Reading and Sources
- Game Boy, Wikipedia
- A timeline of Game Boy’s record-breaking history, Guinness World Records
- Game Boy hardware and technical documentation, Gekkio
- Game Boy technical reference, Jeff Frohwein
- A Beginner’s Guide to Modding Game Boys, Hand Held Legend
- Game Boy bivert module overview, Hand Held Legend
- HHL Bivert Module V2 technical review, Gekkio
- DMG RetroPixel IPS Q5 kit, FunnyPlaying
- DMG IPS installation and compatibility notes, ZedLabz
- Game Boy DMG power mods, Hand Held Legend
- Little Sound Dj official site
- Game Boy archival photography, Wikimedia Commons